Like aperture priority, shutter priority is a semi-automatic mode of exposure where the shutter speed (or exposure time) is set manually and the aperture is calculated by the camera to obtain the correct exposure for a given scene. As we discussed in the “Exposure Time (Interval)” post, a faster shutter speed (shorter exposure time) can freeze the action or a moving subject; it also helps to minimize the effects of camera shaking (aside for the image stabilization systems). Using a slower shutter speed (longer exposure time) can create a blurred effect, giving the impression of motion.
A vast majority of modern cameras that come with manual controls include both semi-automatic modes (aperture priority and shutter priority) together with the sensitivity selection – the ISO number – see “Photo Sensors – Part 3 (Sensitivity)”.
There are three primary reasons for using shutter priority:
- Stop-action pictures: use 1/125 second or faster shutter speeds as your “priority” setting. For example, freezing the action of a walking person would require 1/250 to 1/500 s, while freezing a flying bird would require 1/1000 s or faster.
- Suggesting motion: use between 1/60 to 1/250 second in the case of very fast action and slower than 1/30 second in cases where the motion is relatively slow. For example, a water fall may require 1/10 s or slower to create a motion blur that is artistically appealing.
- Reduce the likelihood of blurring from “camera shake”: some people have a hard time holding the camera steady when pressing the shutter button. Use 1/125 second or faster depending on how skillful you are. Don’t forget that the longer the focal length, the shorter the exposure time should be. When available, image stabilization systems help allowing shutter speeds of 1/10 to 1/30 s; however, don’t rely too much on these systems if you cannot keep a camera steady anyway.
Let’s take a look at few examples.
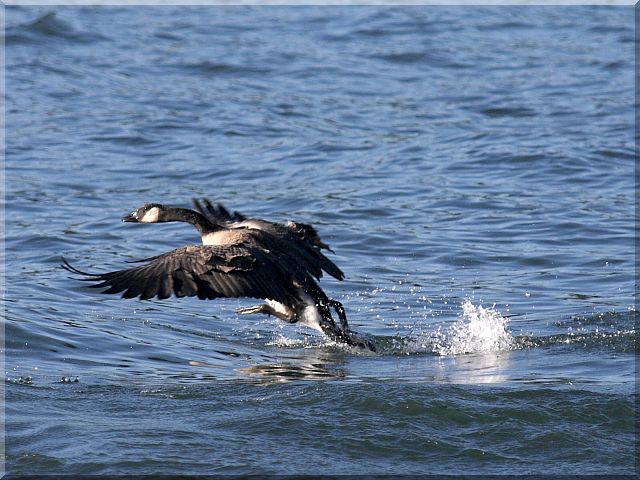
Probably one of the most common cases of freezing action is when we take pictures of animals: running or jumping pets, flying birds, wild animals hunting are just some possible subjects. The following image was captured from the shore of a lake when a flock of Canada Geese took off. Not every attempt I made was successful in capturing the right moment, but this one was good. Obviously, shutter priority helped: manually selecting 1/1000 s ensured that the motion of the bird was frozen. Some may argue that a faster shutter speed might have been “safer”; however, the shorter the exposure time the larger the aperture should be and, eventually, a higher sensitivity may be required. My decision was motivated by the limits of my telezoom (maximum aperture F5.6), the desire to keep the noise of the sensor under control and the fact that the goose is a relatively big bird that cannot move too fast anyway.
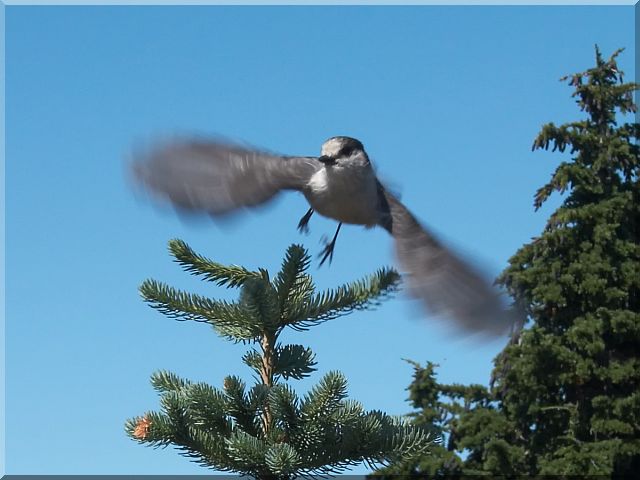
The next example shows what happens if the shutter is too slow for the action you intend to freeze. Few years ago, while hiking with a compact camera on Mt. Washington on Vancouver Island, I prepared for landscapes setting the camera on aperture priority (optimal aperture F8 to get the best DOF and sharpness) and the lowest sensitivity (ISO 50 to minimize the noise). I had no intention of shooting wild life – birds in particular. However, the unexpected happened and I found myself close to this little bird totally unprepared. I took the chance and pressed the button without making any changes in settings. The result is somewhat interesting: the motion blur created by the bird gives life to this capture. This is a perfect example of suggesting motion by reducing the shutter speed. In my case this wasn’t done on purpose but by mistake. If you return to my “Exposure Time” post you will see a deliberate case of slow shutter speed used to create a “dreamy” appearance of a water fall.
Again, remember the basic rule: with a priority setting made, the camera adjusts its shutter speed (if aperture priority was set) or aperture (if shutter priority was set) to let enough light in to expose the picture properly. This rule assumes that the sensitivity remains fixed.
Use each priority mode to your intent – if you get out of bounds enough to possibly cause an overexposure or an underexposure problem, the camera will warn you.
Some may ask: “Why not keeping the aperture and the exposure time fixed and automatically adjust the sensitivity?” Good question! In fact, some cameras provide a third priority mode called exposure priority that does exactly this. There is a reason this mode is relatively unknown: the sensor noise increases with the sensitivity and the photographers prefer to keep this phenomenon under control. In addition, the sensitivity range is usually smaller than the aperture range or the exposure time range making this mode less useful in practice. On the other hand, compact cameras and some DSLRs may adjust the sensitivity automatically in some cases but not too much. Especially, in scene modes cameras will play with all the exposure parameters (including sensitivity) to obtain the desired result. But this is another story to be told.
In the mean time, please review the posts regarding aperture, exposure time and priority modes – they are the instruments we will use in many other posts and examples.


