As a direct consequence of the sensor geometry, for a given resolution, the pixel density is higher for the smallest sensor (and the size of the pixel itself is smaller). The pixel density is important because this will influence the sensitivity range and especially the noise levels the most. It is probably obvious that the smaller the pixel the less light that pixel will receive and, subsequently, the smaller the electrical signal produced by it. This phenomenon explains why the small compact cameras produce poor quality images from low-light scenes.
The sensitivity (or speed) of the photo sensor is a measure of sensor’s response to light and it was measured on various numerical scales – the most recent being the ISO system. Eventually a very close variation of the ISO system is used to measure the sensitivity of digital cameras. While there is a whole theory behind the sensitivity measurement, for practical purposes we just need to know few things:
- In digital cameras, the sensitivity can be modulated through electronic means; usually, covering ranges of ISO 100…6400 (sometimes even more). Some cameras change the sensitivity automatically, others allow only manual control and many others will do both. As a photographer I prefer the manual control of sensitivity but occasionally I rely on automatic too.
- The lower the ISO number is the lower the sensitivity is – i.e. more light energy is required to produce a good quality image. For example, ISO 50 and ISO 100 are considered low sensitivities.
- The higher the ISO number is the higher the sensitivity is – i.e. less light is needed to produce the image. For example, ISO 3200 and ISO 6400 are considered high sensitivities.
- The noise levels at high sensitivity are higher and the quality of the image decreases. This is one of the compromises we have to make when we take shots in low-light. Some noise reduction in post-processing is possible but the results may not always provide high quality.
- ISO numbers like 100 and 200 are good for daylight shooting in normal conditions (handheld camera, no special filters, etc.). Numbers like 400 and 800 provide an increased sensitivity for lower light conditions (e.g. at dusk or at dawn). Numbers from 1600 and higher are rarely recommended for high quality imaging but low and very low light conditions may require the highest available sensitivity that still produces acceptable results (e.g. indoor, night).
As suggested above, the most obvious effect of selecting a certain sensitivity is related to noise levels. Low end cameras with very small and cheap sensors will produce higher noise levels than high end cameras with larger sensors in similar conditions.
The noise is always more visible in the areas that lack many fine details and in the darker zones of an image.
The next photo is an extreme example of noise with three highlighted areas:
")
Canon 40D with EF-S 17-55/2.8 IS USM, f = 52 mm or f35 = 84 mm, F4, 1/125 sec
A. The noise is clearly visible in a dark area that should have been almost black.
B. The noise in this textured area is less intrusive but still visible.
C. The noise in the highlights is even less visible (but it still exists).
The noise can be reduced through post-processing using various filters but with a price: the loss of details. The next image is the result of such processing:
")
Noise filtered aggressively – notice the loss of details and textures
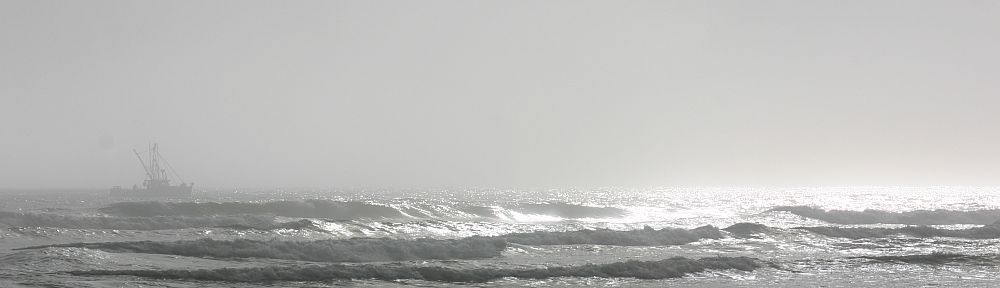
The next example is a full daylight photo taken with a relatively small sensor camera but at a very low sensitivity (ISO 50). The noise is not easily visible even in the areas lacking in details (but still present):
")
Canon G2, f = 7.5 mm, F8, 1/125 sec
Finally, another low noise example is a photo taken with a relatively high end camera equipped with a large sensor (APS-C format). Despite of a higher sensitivity (ISO 200) this image has virtually no noise.
")
Canon 20D with EF 70-300/4-5.6 IS USM, f = 180 mm, F8, 1/500 sec
In conclusion, get a camera with a larger sensor that fits your budget (such cameras are more expensive) and always use the lowest sensitivity (ISO number) that produces the desired image for a given scene.
 I will return to the problem of sensitivity and noise in the future posts when I will spend more time on the act of shooting with all its implications.
In the mean time, review what we learned and don’t be shy of asking questions here. Use the Comment button on the right side of the post title or click on the title to visit the whole post on its page.