Despite the fact that the angle of view and the focal length are two terms often used in camera reviews, it seems that the general public is less aware of the close relationship between the two. No wonder why when it comes to the choice of a camera the buyer is confused and relies almost entirely to the sales person for the decision.
As some found in a physics book or simply in a dictionary, the focal length is the distance between the center of the lens and the point where all the light rays meet (or converge). In photography we rarely use this definition. It is far more important to know that a lens with a shorter focal length bends the light more strongly bringing them to a focus in a shorter distance; in a camera this translates into a shorter distance between the optical center of the lens and the sensor.
Why is this important in photography? The answer to this question is the second term the angle of view (sometimes named field of view). This is a measure of the angular extent of a given scene that is projected on the sensor of the camera. Intuitively, we know that the larger the angle the more we can “fit” into the image – this is an effect often desired by the landscape photographers.
Simplifying things, the following illustration shows why the two terms are linked to each other.
We take three different lenses characterized by three different focal lengths: fW < fN < fL (for example, 28 mm, 50 mm and 80 mm). In order to produce a sharp image (i.e. to focus) the lens with a shorter focal length will have to be placed closer to the sensor, while the lens with a longer focal length will have to be placed farther from the sensor. Now it becomes obvious (follow the illustration) that the lens with a shorter focal length will provide a wider angle of view than the lens with a longer focal length that will provide a narrower angle of view. As a real photographic example you can review my previous post where I included three photos taken with three different focal lengths.
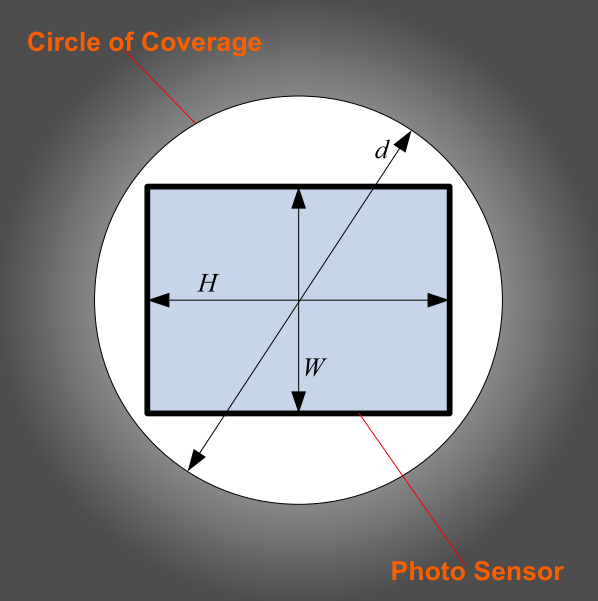
What we ignored is the fact that the photo sensor is not circular; the lens produces a circular image while the sensor is rectangular. The situation looks like in the next illustration.
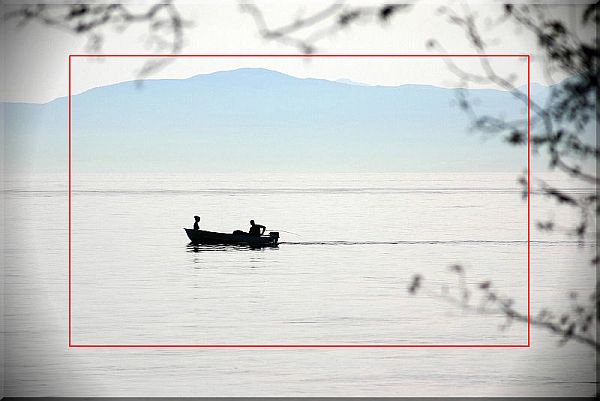
The photo sensor must be placed inside the circular image (circle of coverage) produced by the lens. Normally, the diameter of the circle of coverage should be greater than the diagonal of the sensor (like the illustration). Sometimes, especially at wide angles (short focal distance), the circle of coverage shrinks so that the diameter of the circle becomes slightly smaller than the diagonal of the sensor. The result is called vignetting – i.e. a reduction of an image brightness at the periphery compared to the image center. The following photo presents the phenomenon of vignetting (here produced artificially to illustrate the effect).
The area in the red rectangle can be cropped later to remove the darker corners. Most of the photo processing software offers tools to correct for the vignetting effect but this means that you will not be able to use the image as it comes right from the camera. Vignetting may also impact your ability to create panoramas by “stitching” multiple photos together (we will have a separate post for panoramas).
The camera manufacturers try to minimize vignetting as much as possible, especially in high end cameras. However, cheap cameras may suffer from this phenomenon.
In the photographic equipment the lenses are often referred by terms that express their angle of view. Here are some examples:
- fisheye lenses: up to 180° and beyond.
- ultra wide angle lens 84° to 114°
- wide-angle lenses: 64° to 84°
- normal, or standard lenses 40° to 62°
- long focus lenses: 35° or less with the following sub-categories:
- medium telephoto: 10° to 30°
- super telephoto: 1° to 8°
The angle of view can be defined considering the geometry of the sensor:
- Horizontal angle of view: αh corresponding to the horizontal size;
- Vertical angle of view: αv corresponding to the vertical size;
- Diagonal angle of view: αd corresponding to the diagonal size.
In practice the diagonal angle of view is probably more important. However, we have to keep in mind that for a given focal length it is not possible to change the angle of view without cropping the image.
For those interested in numbers, here is an equation that produces the angle of view based on the focal length (f) and the size of the sensor (d):
α = 2 × arctan (d / 2f)
For example, considering a 35 mm camera with a sensor characterized by H = 24 mm, W = 36 mm and d = 43.3 mm, we obtain the following angles of view:
αh ≈ 39.6°, αv ≈ 27.0° and αd ≈ 46.8°
In another post we will look at sensors, their sizes and will determine their angle of view for different lenses.
In the mean time, stay “focused” on this discussion because there is more interesting material to follow.


